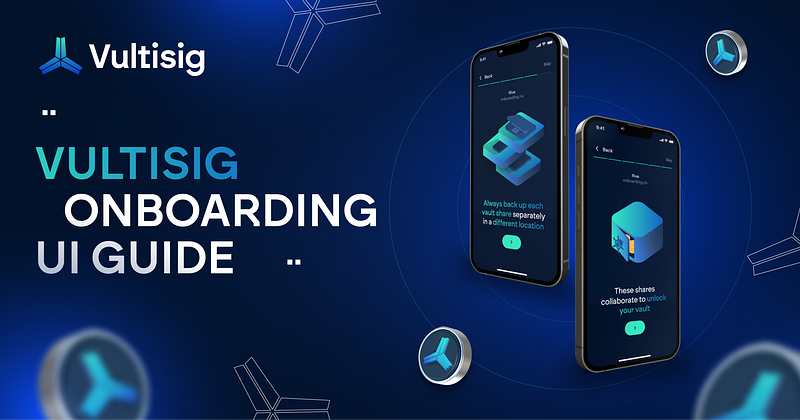
Vultisig Onboarding UI Guide: Creating Secure and Fast Vaults
2025-03-10 — 9 min read
🔒 Overview
Below you’ll find two complete step-by-step guides on how to create new Vultisig vaults. The first walks you through the process of creating a Secure Vault—from opening the app to securely storing your vault shares. The second does so for a Fast Vault, again from start to finish.
We recommend bookmarking this article, so that you might use it as a resource anytime you might want a refresher on how to create a new Vultisig vault, no matter the type.
🔒 What is a Secure Vault?
A “Secure Vault” is the most secure vault type that Vultisig has to offer. Best compared to and designed to act as a cold storage wallet, the Secure Vault is that vault where your long term assets are kept.
Let’s walk through the process of how to create and use a Vultisig Secure Vault.
🔒 Creating Your First Secure Vault
Before you Begin
Whether your first or your tenth, there are two important requirements prior to creating a Vultisig Secure Vault:
- While Vultisig recommends using three devices to create a Secure Vault, the process at minimum requires two devices— e.g., phone & laptop
- Prior to vault creation, all devices used must be updated with the latest version of the Vultisig app
Once you have at least two devices on hand and you’ve ensured that all are updated with the latest Vultisig app version, then you may proceed through the following steps.
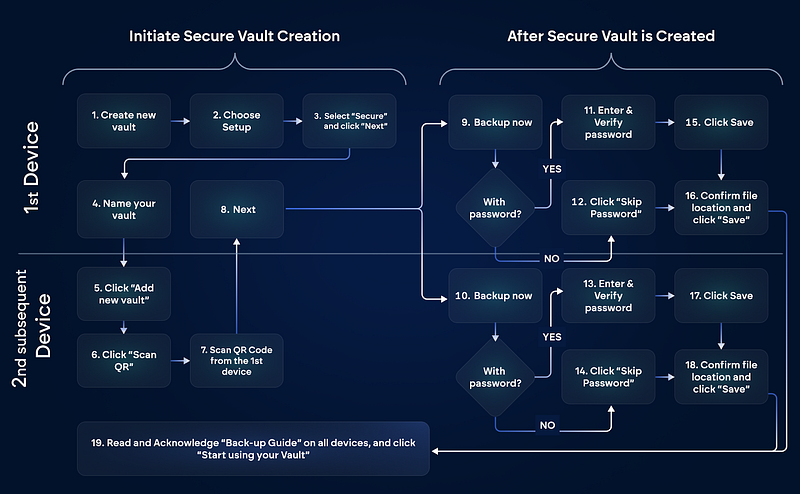
Secure Vault Creation Steps
On one device, enter the Vultisig app. (Note: It does not matter which device you choose to use first or second).
Click Create new vault to initiate a new vault creation. (Note: If this is not your first vault creation, you must first click Add New Vault prior to step 2).
On the next page, select Secure Vault as the vault type. Click Next.
Assign a name to your vault, typing it in the space provided. Click Next. A QR code will appear on the screen and the device will begin searching for linking devices.
On your second device, open the Vultisig app and click Add New Vault.
Among the options, click Scan QR. Proceed to scan the QR Code displayed on the first device. (Note: If you are using three devices, repeat steps 5–6 with your third device here).
On your first device, click Next. After about 30 seconds, you will be prompted to continue to the next part of the Secure Vault setup: backing up your vault.
🔒 Backing Up Your Secure Vault
Read through this section carefully, as the action steps taken involve multiple personal considerations.
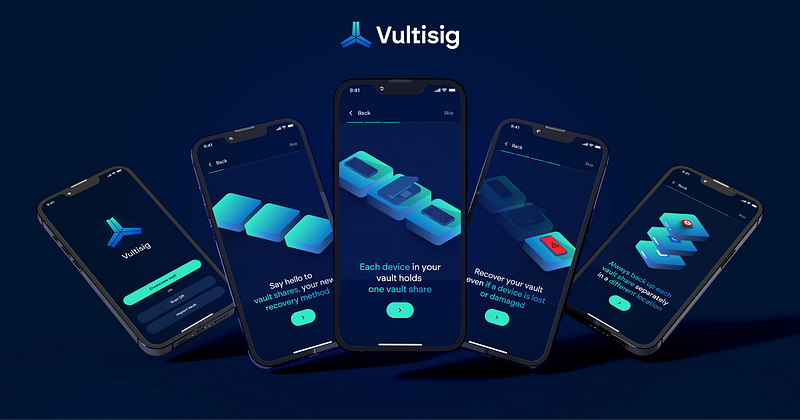
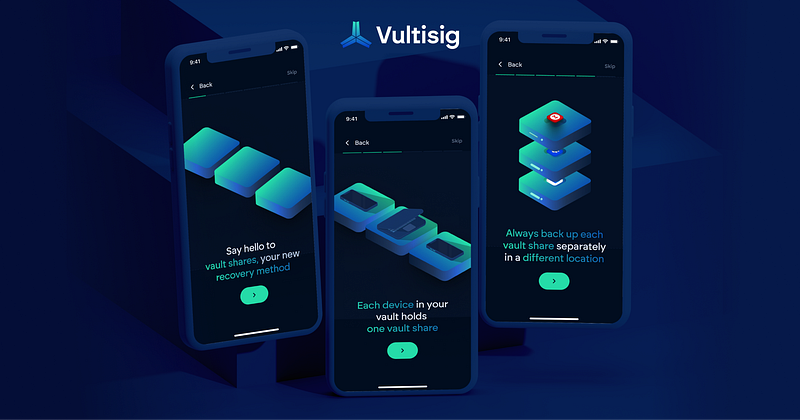
As part of Vultisig’s security design, each of the devices used in creating your Secure Vault generates its own distinct vault share, each of which must be “backed up” and stored in a separate and secure location. This means the following walkthrough must be performed on each device (fortunately, the process itself is as simple as downloading and sending a file).
Vault Share Backup Steps
Once your Secure Vault has been created, each device will immediately prompt you to back up that device’s vault share. Choose any device to start with, and click through the right-facing arrows until you arrive at the prompt screen, reading each screen prompt as you do.
Here, choose to back up this vault share with or without a password. Should you wish to bypass this step, simply click Skip Password. However, should you choose to back up your vault share with a password, enter it in the given space, then re-enter it below. Click Save. (Note: because password reset is impossible on Vultisig, it is recommended that you choose, in lieu of password creation, to increase your vault share security through distribution measures. However, should you opt to create a password, you should the highest care to choose one you will never forget).
Click Save to download your file. (Note: depending on the device, you may have the option here to Export this file to a new external location).
If you did not export your file to a new location at the end of Step 3, you must do so now. Choose a memorable and secure external location. Find the downloaded vault share file, then carefully send it to this new location. (Note: as best practice, do not store any of your vault share files in the same location; all vault share files should be well distributed).
Confirm your backup file has been stored in the correct digital location.
Repeat this process on each of the remaining devices.
Once you have downloaded each backup file and stored them all in different locations, return to the Vultisig app and click the right arrow. Read Vultisig’s listed Back-up Guide prompts carefully, confirming each consideration has been attended to.
Congratulations! You’ve just acquired the most secure digital asset storage possible.
The Importance of Properly Backing Up Vault Shares
Backing up and securely storing your vault shares according to Vultisig’s instructions is far from an “if you feel like it” step; it is an essential part of Vultisig vault creation. These files are the only way you can recover access to your vault; should you neglect to properly store these files and you lose one or more of your devices, you will have lost those vault shares, i.e. your funds, forever.
Additionally, sending your vault share files to well-dispersed external locations is absolutely imperative: If a bad actor gains access to a device or an account of yours where more than one vault share is stored, then they effectively have complete access to your vault, i.e. your funds.
No vault shares from any one vault should be stored in the same location or on the same device on which the vault was created.
🔒 What is a Fast Vault?
Whereas a Secure Vault is akin to a cold storage wallet, Vultisig’s Fast Vault is best compared to a hot wallet. The design of this vault type is optimized for more active use; and, while still far more secure than traditional wallets, is lighter in its security requirements than the heavier Secure Vault.
Let’s now walk through how to create a Fast Vault.
🔒 Creating Your First Fast Vault
Before you Begin
Unlike a Secure Vault, creating a Fast Vault requires only one device. Still, you must ensure this device is equipped with the latest version of the Vultisig app.
Once you have your device on hand and you’ve ensured it’s updated with the latest Vultisig app version, then you may proceed through the following steps.
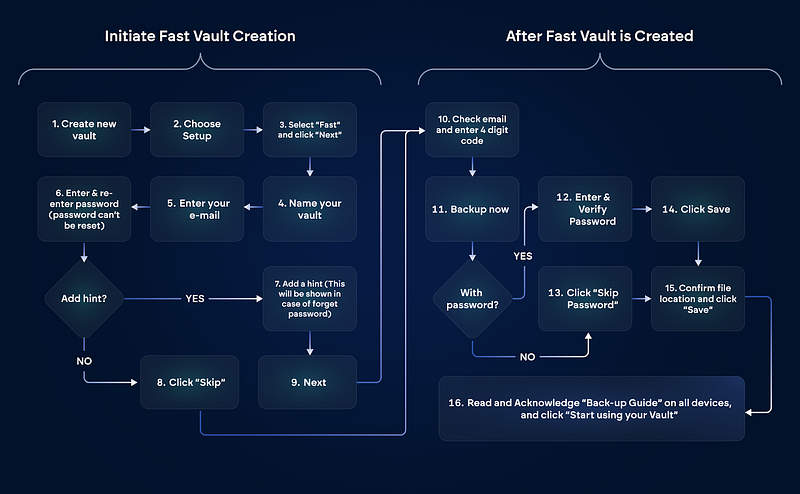
Fast Vault Creation Steps
On your device, enter the Vultisig app and click Create new vault to initiate a new vault creation with your device. (Note: If this is not your first vault, you will first have to click Add New Vault prior to step 2).
Ensure you have selected Fast Vault. Click Next.
Assign a name to your vault by typing it in the space provided. Click Next.
Here, enter an email address to receive the Vultiserver vault share file (Note: to learn more about how Vultisig deploys its Vultiserver in Fast Vault creations, read here).
Unlike Secured Vaults where creating a password was optional, Fast Vaults require this. This password encrypts the Vultiserver vault share. Enter a memorable password here, then re-enter it. Click Next. (Note: As a reminder, Vultisig does not allow password resets, so you should take the highest care to choose a simple and unforgettable password. In lieu of password complexity, rely on distribution methods to enhance your vault share’s security. Best practice is to use a password manager).
You are given the option to add a password hint. Should you forget your password, this hint will show. Should you choose to add a password hint, enter it here, then click Next; otherwise, click Skip.
Here, you will be prompted to verify that you’ve received the Vultiserver share, i.e. that second vault share that is not your device’s share — this verification confirms that you now have complete, self-custodial access to your newly created vault. To verify, navigate to the inbox of the email address you entered during the backup process. You will see an email containing a 4-digit code.
Return to the Vultisig app and enter this 4-digit code to verify receipt of your Fast Vault’s Vultiserver vault share.
🔒 Backing Up Your Fast Vault
As above, read through this section carefully and complete all tasks in full.
Vault Share Backup Steps
Once you’ve created your Fast Vault, your device will prompt you to complete a backup of its vault share. Continue to the next page.
Here, you will be given the choice to continue your vault share backup with or without password. Should you choose to add a password, enter it here, then re-enter it. Once finished, click Save. Otherwise, click Skip Password. (Note: see above for Vultisig’s suggestions on password creation).
Confirm the file’s location, then click Save back in the Vultisig app. Locate your vault share file and export it to a secure, externa location for storage. Confirm its new location.
Read and acknowledge the Back-up Guide prompts carefully, confirming you have considered and executed each task accordingly.
🔒 Summary
We hope these guides will helpto ease your entry into a more secure digital wallet experience. If you find you would benefit from a more interactive vault creation experience, @Cryptolush_ shared an excellent tutorial moving through the first guide above, Vultisig Secure Vault Setup from Start to Finish.
Additionally, if you have more questions, or if you would like to join and eengage with the community, please do feel free to join the Vultisig Discover Server.

Related articles
![THORChain Community Podcast #207 thumbnail featuring Chad Barraford, Kenton and Patriotsounds discussing the network restart timeline, chain integrations and POL fee split.]()
Jun. 11, 2026
THORChain Eyes Trading by Midweek: Chad Maps the Final Restart Steps, With Zcash and Monero Queued
- Podcast
![THORChain Podcast #206 thumbnail.]()
Jun. 6, 2026
The Stablecoin That Survived a 95% Crash: Zephyr Comes to THORChain
- Podcast
![THORChain Podcast #205 thumbnail featuring co-founder Chad Barraford.]()
Jun. 4, 2026
THORChain Still Paused, Monero Targeted for Month-End, and the Limit Order Debate
- Podcast
![THORChain Podcast #204 thumbnail, presented by Raynalytics]()
May. 30, 2026
More Than a Block Explorer: Deving.zone Turns THORChain Into a Living Map
- Podcast
![THORChain Podcast #203 thumbnail featuring co-founder Chad Barraford discussing the v3.19 protocol update, Soda Labs, and vault hardening, presented by Raynalytics]()
May. 29, 2026
THORChain Path to Restart: v3.19, Soda Labs, and Hardening the Vaults
- Podcast
![THORChain May 15, 2026 Exploit Report #1]()
May. 20, 2026
THORChain Exploit Report #1
![]()
May. 14, 2026
Explanation of the 6 Preset Strategies to Help Create Your CCL Strategy
![]()
May. 13, 2026
The Casino Problem: When Crypto Forgets What It Was Built For
![]()
May. 12, 2026
THORChain Protocol Upgrade v3.18
![]()
May. 11, 2026
Dash is coming to THORChain
![]()
May. 8, 2026
Monero Merged, Reserve Burn, Marketing Update | Podcast #196
![]()
May. 7, 2026
Marketing Update: Feb - March 2026
![]()
May. 5, 2026
RUJI Staking Rewards Are Live, Earn Real Protocol Revenue on Rujira
![]()
May. 4, 2026
Bior Labs Cards Are Imminent: Bill Pay, $10K Virtual Cards and a Stablecoin Alpha
![]()
May. 2, 2026
Live from Bitcoin Vegas: 2 bps Stable Swaps, v3.18 Next Week and the Affiliate Revshare Plan